Following the procedure doesn't guarantee a "good" film, simply a competent one. How many "good" films are incompetent?
If each step is the "most important" track reading is clearly the most important too.
In the olden days here's what you'd do:
1) edit the soundtrack on tape
2) send tape to lab to get transferred to 35mm stripe magnetic film (putting the sound on a magnetic track opposed to an optical track). "Stripe" meant there was a stripe of mag down one side of the film. If the entire 35mm film was covered with this material it would be called "Full Coat".
3) wait a day
4) break down the audio frame by frame using manual rewinds and a "squawkbox".

Track reading is one element of drawn animation that hasn't been made significantly easier by digital technology.
We don't have to rely on labs to transfer audio, but the actual analysis is no simpler now than it used to be.
We don't have to rely on labs to transfer audio, but the actual analysis is no simpler now than it used to be.
It can all be done in Final Cut Pro.
First things first. You're doing drawn animation. You do that 24 frames per second. Make sure your project is set up that way.
If your cut is at 29.97 (and that's perfectly legitimate and proper), you'll need to export your video at 24fps and reimport OR multiply all of your frame counts by .8 to translate them to the proper rate.
Set your timebase to "Frames". This is done by right clicking (control+click) on the timecode number in the upper left hand of your timeline. It defaults to timecode. Animation happens in frames, not decimals of seconds.
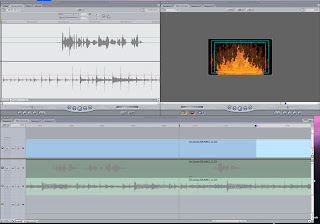
Then, on the bottom left of the Timeline window make your tracks as large as possible (that's the four bars that look like cel phone reception). Click the arrow directly to the right of that and select "show audio waveforms". This will give you a visual read of the sound track.
From here, it's just scrubbing through frame by frame and marking down what you hear on the exposure sheet.
The visual of the timeline makes it easy.
In this case the voice is on the upper track and the music on the bottom.
For lip sync -the vowels are important and will take up the most frames. Find the vowels, mark their beginning and end then bracket them with the consonants. Most consonant sounds will only take 1 or 2 frames. "S" sounds are the general exception, obviously stylized reads may differ as well.
For music -mark the beats with "X". If you've got instrumentation mark ins and outs of instruments or particular themes. You can specify the nature of the sound to the extent its relevant to the action BUT the fact of the sound -that it is there is ALWAYS relevant to the animation.

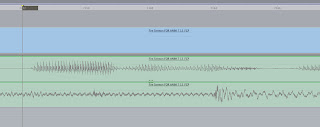
This film doesn't have lip sync. Breaking down phonetics for 1:30 can take all day. Here we have a phrase break down. The beginning of a phrase is marked on the in frame, the end on the out frame. If anything is sync sensitive that would be specified.
Note the "X"s in the "track" column, which also contains the crash for "cymbals" and the mark that the cymbal is loud.
The "action" column gives a general description of the scene.
1 comment:
This is one of the things I wish they had taught us in college. Sure they showed us photocopies of old exposure sheets, but we never wrote them out. I didn't learn that till I worked at 8 Hats High. They just stuck us in front of a computer and taught us Magpie. While it's a fine program, no one's ever heard of it.
Either way, tracking is still one of my favorite parts of the process... it must be my masochistic tendencies.
Post a Comment